Strawberry Lemonade Bars have been my go-to recipe for brightening up any gathering, big or small, for as long as I can remember. There’s something truly magical about the way the sweet sun-ripened strawberries dance with the bright, zesty lemon, all cradled in a buttery shortbread crust. These bars aren’t just a dessert; they’re a burst of pure joy, a taste of summer sunshine no matter the season. I first perfected this recipe for a family reunion years ago, and they vanished in minutes, sparking a tradition that continues to this day.
Crafting balanced flavors is a passion of mine, and these Strawberry Lemonade Bars truly hit that sweet spot between tangy and sweet without being overwhelming. They bring back memories of warm afternoons and happy faces, and I’m so excited to share all my secrets to making them absolutely perfect with you today. Get ready to bake a little happiness!
Why You’ll Love These Strawberry Lemonade Bars
These Strawberry Lemonade Bars aren’t just another dessert; they’re an experience! You’ll fall in love with them for so many reasons, from their vibrant flavor to their sheer versatility. They truly stand out from the crowd.
- Perfect Sweet-Tart Balance: The tang of fresh lemon perfectly complements the natural sweetness of strawberries.
- Irresistible Texture: A crisp, buttery shortbread crust meets a creamy, luscious filling.
- Visually Stunning: The beautiful pink swirl makes them a showstopper on any dessert table.
- Crowd-Pleaser: Loved by adults and kids alike, they’re always a hit.
- Surprisingly Easy: Despite their gourmet look, they’re straightforward to make.
The Irresistible Charm of Strawberry Lemonade Bars
What makes these Strawberry Lemonade Bars so special is that incredible flavor combination. It’s like a sunny day in every bite! The bright citrus notes are refreshing, while the sweet strawberry swirl adds a delightful fruity complexity. This isn’t just a lemon bar with a hint of fruit; it’s a harmonious marriage of two classic summer flavors.
Perfect for Any Occasion
Whether you’re hosting a backyard barbecue, looking for a treat for a potluck, or simply want something sweet and fresh for your family, these bars fit the bill. They’re elegant enough for a special celebration but casual enough for a weeknight dessert. Plus, they travel beautifully!
Essential Ingredients for Delicious Strawberry Lemonade Bars
Creating truly delicious Strawberry Lemonade Bars starts with gathering the right ingredients. Each component plays a vital role in achieving that perfect balance of flavor and texture. Don’t skimp on quality here; fresh is always best, especially when it comes to the star fruits!
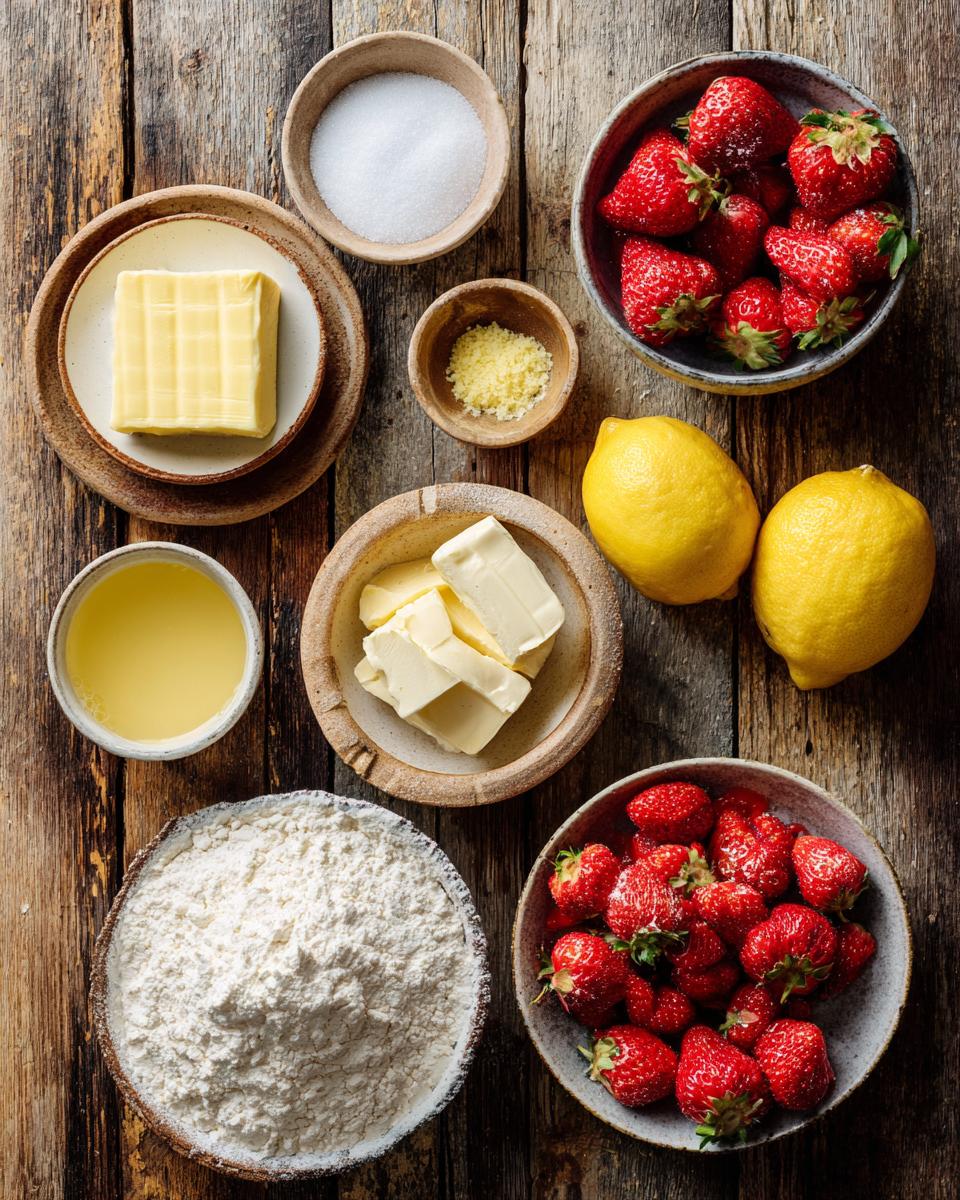
- 1 cup (2 sticks) unsalted butter, softened: This is the foundation for your rich, tender shortbread crust. Softened means it yields to a gentle press, not melted.
- 1/2 cup granulated sugar (for crust) & 2 tablespoons granulated sugar (for strawberry topping): Sweetness for both layers, carefully measured.
- 1/4 teaspoon salt: Essential for balancing flavors and enhancing the sweetness of the crust.
- 2 cups all-purpose flour: The backbone of your sturdy, yet delicate, shortbread.
- 1 (14 ounce) can sweetened condensed milk: This creates the creamy, decadent base for your lemon filling, no eggs needed!
- 1/2 cup fresh lemon juice & 1 tablespoon lemon zest: Fresh is non-negotiable here! The juice provides the tartness, and the zest delivers that intense, aromatic lemon flavor.
- 1 cup fresh strawberries, hulled and quartered: The vibrant, fruity star of the swirl. Make sure they’re ripe and flavorful.
Gathering Your Strawberry Lemonade Bars Components
When making your Strawberry Lemonade Bars, paying attention to the quality of your ingredients truly makes all the difference. Using fresh lemons for both the juice and zest will give you a much brighter, more authentic lemon flavor than anything from a bottle. Similarly, ripe, sweet strawberries will create a more vibrant and delicious swirl. Think of these as the building blocks for perfection!
Equipment for Making Strawberry Lemonade Bars
You don’t need a fancy kitchen to whip up these delightful Strawberry Lemonade Bars! Just a few basic tools will get the job done beautifully. Having the right equipment makes the process smooth and enjoyable, ensuring your bars turn out perfectly every time.
Tools for Crafting Perfect Strawberry Lemonade Bars
- 9×13 inch baking pan: This size is essential for the correct bar thickness.
- Parchment paper: Makes lifting out and cutting your bars incredibly easy.
- Large mixing bowls: For the crust and the lemon filling.
- Hand mixer or stand mixer: Great for creaming the butter and sugar for the crust.
- Whisk: For smoothly combining the lemon filling ingredients.
- Small saucepan: To gently cook down those lovely strawberries.
- Knife or skewer: For creating that beautiful strawberry swirl.
- Wire rack: Crucial for proper cooling of the bars.
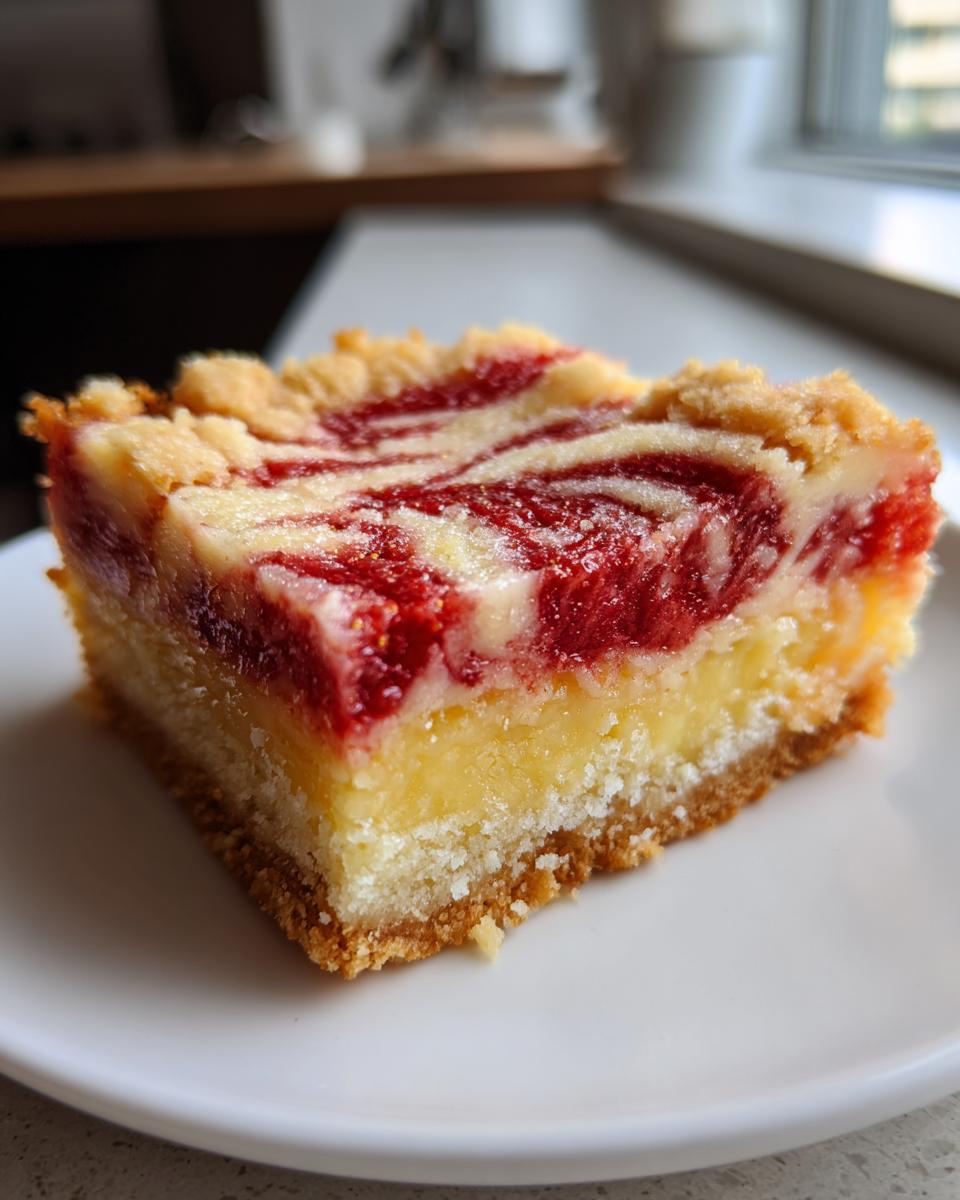
How to Prepare Your Strawberry Lemonade Bars
Making these Strawberry Lemonade Bars is a truly rewarding process, and I’m going to walk you through each step with all the little tips I’ve learned along the way. The key is to take your time with each component, and you’ll be rewarded with a dessert that looks as good as it tastes. Let’s get baking!
Step-by-Step Guide to Strawberry Lemonade Bars Perfection
Following these steps carefully will ensure your Strawberry Lemonade Bars turn out perfectly, with that signature crisp crust, creamy filling, and beautiful fruity swirl. Pay attention to the details, especially the baking and cooling times!
Crafting the Shortbread Crust
First things first, preheat your oven to 350°F (175°C). While it’s heating, line your 9×13 inch baking pan with parchment paper. Make sure to leave an overhang on the long sides – this is your secret weapon for easily lifting the cooled bars out later! In a large bowl, combine your softened butter, 1/2 cup granulated sugar, and salt. Cream these together until the mixture is light and fluffy. This usually takes about 2-3 minutes with a hand mixer. Gradually add the all-purpose flour, mixing on low speed until just combined. You’re looking for a soft dough, not a dry, crumbly one. Press this dough evenly into the bottom of your prepared pan. Bake for 18-20 minutes, or until the edges are just lightly golden. This partial bake is crucial for a firm, delicious base that won’t get soggy.
Developing the Zesty Lemon Filling
While your crust is baking and cooling slightly, it’s time to whip up that vibrant lemon filling. In a separate medium bowl, whisk together the entire can of sweetened condensed milk, the 1/2 cup of fresh lemon juice, and the 1 tablespoon of lemon zest. Whisk until the mixture is completely smooth and uniform. You’ll notice it thickens slightly as you whisk, thanks to the acidity of the lemon juice reacting with the milk. This filling is wonderfully simple, yet packed with incredible flavor thanks to that fresh lemon!
Creating the Vibrant Strawberry Swirl
Now for the beautiful strawberry topping! In a small saucepan, combine your hulled and quartered fresh strawberries with the 2 tablespoons of granulated sugar. Cook this over medium heat, stirring occasionally. The strawberries will start to break down and release their juices, and the mixture will thicken slightly – this usually takes about 5-7 minutes. Once it reaches a jam-like consistency, remove it from the heat and set it aside to cool just a bit. Once your crust is out of the oven, pour the lemon filling evenly over the warm crust. Then, dollop small spoonfuls of the strawberry topping over the lemon layer. Using a knife or a skewer, gently swirl the strawberry into the lemon filling. Don’t overmix; you want distinct swirls. Return the pan to the oven and bake for another 20-25 minutes, or until the edges are set and the center has just a slight jiggle. Finally, let them cool completely on a wire rack before chilling in the refrigerator for at least 2 hours. This chilling step is non-negotiable for clean cuts!
Tips for Success with Your Strawberry Lemonade Bars
Achieving truly perfect Strawberry Lemonade Bars means paying attention to a few key details. My best advice for these bars is to really commit to the cooling time. It makes all the difference in getting clean, beautiful slices. A little patience goes a long way!
Ensuring Flawless Strawberry Lemonade Bars
- Use Fresh Ingredients: Always use fresh lemon juice and zest; bottled simply won’t give you the same vibrant flavor.
- Don’t Overmix the Crust: Mix the flour into the crust dough until just combined to keep it tender, not tough.
- Chill Thoroughly: Refrigerate the bars for at least 2 hours, or even overnight, before cutting. This ensures a firm set and clean, crisp edges.
- Gentle Swirling: When adding the strawberry swirl, use a light hand. You want distinct ribbons, not a fully mixed-in color.
Strawberry Lemonade Bars: Frequently Asked Questions
I know when you’re trying a new recipe, especially one as delightful as these Strawberry Lemonade Bars, questions pop up! I’ve gathered some of the most common ones I get asked about these bars to help you feel confident in the kitchen.
Common Questions About Strawberry Lemonade Bars
Can I use frozen strawberries? Yes, you absolutely can! If using frozen strawberries for the topping, thaw them first and drain any excess liquid. You might need to cook them a minute or two longer to achieve that thickened, jam-like consistency, as they tend to release more water.
My lemon filling seems too runny, what happened? This usually means your sweetened condensed milk either wasn’t fully combined with the lemon juice, or it didn’t bake quite long enough. The acidity of the lemon juice helps to “set” the milk. Ensure good whisking and bake until the edges are set and the center has only a slight jiggle, not a liquid wobble.
How do I get clean cuts? The secret to perfectly neat Strawberry Lemonade Bars is thorough chilling! Make sure they’re completely cold, ideally after at least 2 hours in the fridge. Use a sharp, warm knife (run it under hot water and wipe dry between cuts) for the cleanest edges.
Can I make these ahead of time? Absolutely! These Strawberry Lemonade Bars are fantastic for making a day or two in advance. In fact, the flavors often meld and deepen beautifully after a day in the refrigerator. Just keep them covered tightly.
Storing and Reheating Your Strawberry Lemonade Bars
Keeping your Strawberry Lemonade Bars fresh is simple, ensuring you can enjoy their deliciousness for days! Once completely cooled, store them in an airtight container in the refrigerator. They’ll stay perfectly fresh and delightful for up to 3-4 days. There’s no need to reheat them; these bars are best enjoyed chilled, straight from the fridge!
Keeping Your Strawberry Lemonade Bars Fresh
Estimated Nutritional Information for Strawberry Lemonade Bars
While I’m not a nutritionist, I can provide an estimated nutritional breakdown for these delightful Strawberry Lemonade Bars based on the ingredients. Remember, these values are approximations and can vary slightly depending on specific brands and exact portion sizes. Each bar (based on 24 servings) is estimated to contain around 250 calories, with about 15g of fat (9g saturated), 28g of carbohydrates (including 25g sugar), and 3g of protein. Enjoy them as a sweet treat!
Print
Strawberry Lemonade Bars
- Total Time: 3 hours 10 minutes
- Yield: 24 bars 1x
- Diet: Vegetarian
Description
These delightful Strawberry Lemonade Bars offer a perfect balance of sweet and tangy flavors. A buttery shortbread crust supports a creamy, zesty lemon filling, topped with a vibrant strawberry swirl. They’re an ideal treat for any occasion, especially when fresh strawberries are in season.
Ingredients
- 1 cup (2 sticks) unsalted butter, softened
- 1/2 cup granulated sugar
- 1/4 teaspoon salt
- 2 cups all-purpose flour
- 1 (14 ounce) can sweetened condensed milk
- 1/2 cup fresh lemon juice
- 1 tablespoon lemon zest
- 1 cup fresh strawberries, hulled and quartered
- 2 tablespoons granulated sugar (for strawberry topping)
Instructions
- Preheat oven to 350°F (175°C). Line a 9×13 inch baking pan with parchment paper, leaving an overhang on the sides.
- In a large bowl, cream together the softened butter, 1/2 cup granulated sugar, and salt until light and fluffy.
- Gradually add the flour, mixing until just combined and a soft dough forms.
- Press the dough evenly into the bottom of the prepared baking pan. Bake for 18-20 minutes, or until lightly golden.
- While the crust bakes, prepare the strawberry topping. In a small saucepan, combine the quartered strawberries and 2 tablespoons granulated sugar. Cook over medium heat, stirring occasionally, until the strawberries break down and the mixture thickens slightly, about 5-7 minutes. Remove from heat and set aside to cool slightly.
- In a separate medium bowl, whisk together the sweetened condensed milk, lemon juice, and lemon zest until smooth.
- Pour the lemon filling evenly over the warm crust.
- Dollop small spoonfuls of the strawberry topping over the lemon filling. Use a knife or skewer to gently swirl the strawberry into the lemon layer.
- Return the pan to the oven and bake for an additional 20-25 minutes, or until the edges are set and the center is slightly jiggly.
- Remove from oven and let cool completely on a wire rack. Once cool, refrigerate for at least 2 hours before cutting into bars.
Notes
- For best results, use fresh lemon juice and zest.
- Ensure the bars are completely chilled before cutting to prevent them from falling apart.
- Store leftover bars in an airtight container in the refrigerator for up to 3-4 days.
- You can adjust the amount of lemon juice to your preference for more or less tang.
- Prep Time: 25 minutes
- Cook Time: 45 minutes
- Category: Dessert
- Method: Baking
- Cuisine: American
Nutrition
- Serving Size: 1 bar
- Calories: 250
- Sugar: 25g
- Sodium: 80mg
- Fat: 15g
- Saturated Fat: 9g
- Unsaturated Fat: 5g
- Trans Fat: 0.5g
- Carbohydrates: 28g
- Fiber: 1g
- Protein: 3g
- Cholesterol: 40mg