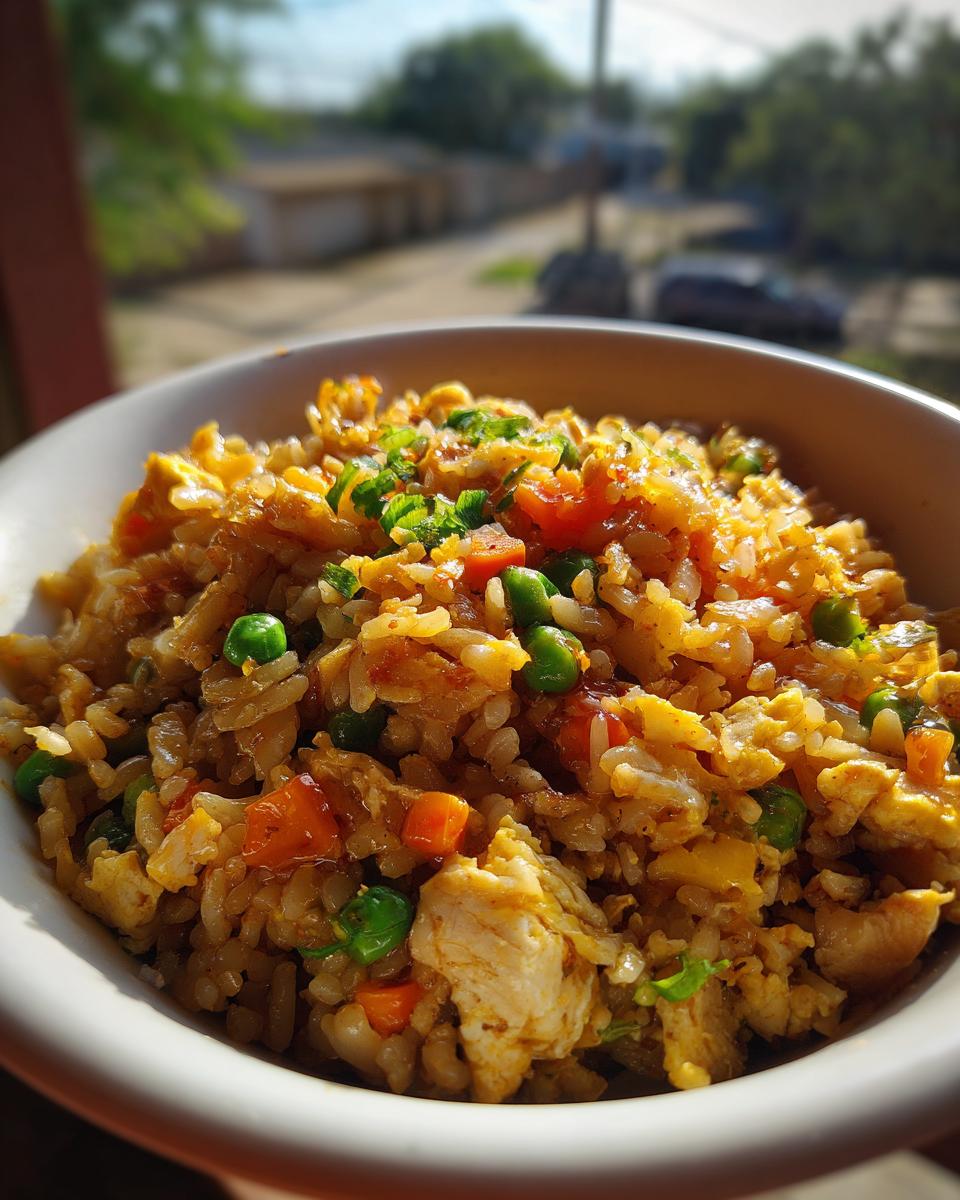
Hibachi Fried Rice has been a staple of my family’s takeout nights for as long as I can remember. There’s just something magical about that smoky, savory goodness that hits all the right notes every single time. For years, I thought it was a dish best left to the experts with their giant griddles and lightning-fast spatulas. But let me tell you, making Hibachi Fried Rice at home is not only incredibly satisfying but also surprisingly simple!
This recipe brings all those beloved flavors and textures right into your own kitchen. You’ll find yourself whipping up fluffy rice, tender-crisp vegetables, and that signature umami sauce with ease. Forget waiting for delivery or spending a fortune; this is your ticket to delicious, authentic-tasting Hibachi Fried Rice whenever the craving strikes.
Why You’ll Love This Hibachi Fried Rice Recipe
This Hibachi Fried Rice recipe isn’t just about recreating a restaurant favorite; it’s about bringing joy and ease to your kitchen. You’re going to fall in love with how simple yet incredibly flavorful this dish is. It’s perfect for those busy evenings when you want something satisfying without a lot of fuss. Here’s why this recipe will become a go-to in your home:
- Achieves authentic hibachi flavor at home
- Uses simple, readily available ingredients
- Incredibly quick to prepare and cook
- Customizable with your favorite proteins and vegetables
- A fantastic way to use up leftover rice
The Ultimate Comfort Food: Hibachi Fried Rice
There’s something uniquely comforting about a warm bowl of Hibachi Fried Rice. It’s hearty, savory, and just plain delicious. Each forkful brings a delightful mix of fluffy rice, tender vegetables, and that irresistible umami punch. It’s the kind of dish that always makes you feel good, whether it’s a cozy night in or a casual family dinner.
Quick and Easy Hibachi Fried Rice
One of the best things about this Hibachi Fried Rice recipe is how incredibly fast it comes together. With just 15 minutes of prep and 10 minutes of cook time, you can have a flavorful and satisfying meal on the table in under half an hour. It’s truly ideal for those busy weeknights when you need a delicious dinner without spending hours in the kitchen.
Essential Ingredients for Authentic Hibachi Fried Rice
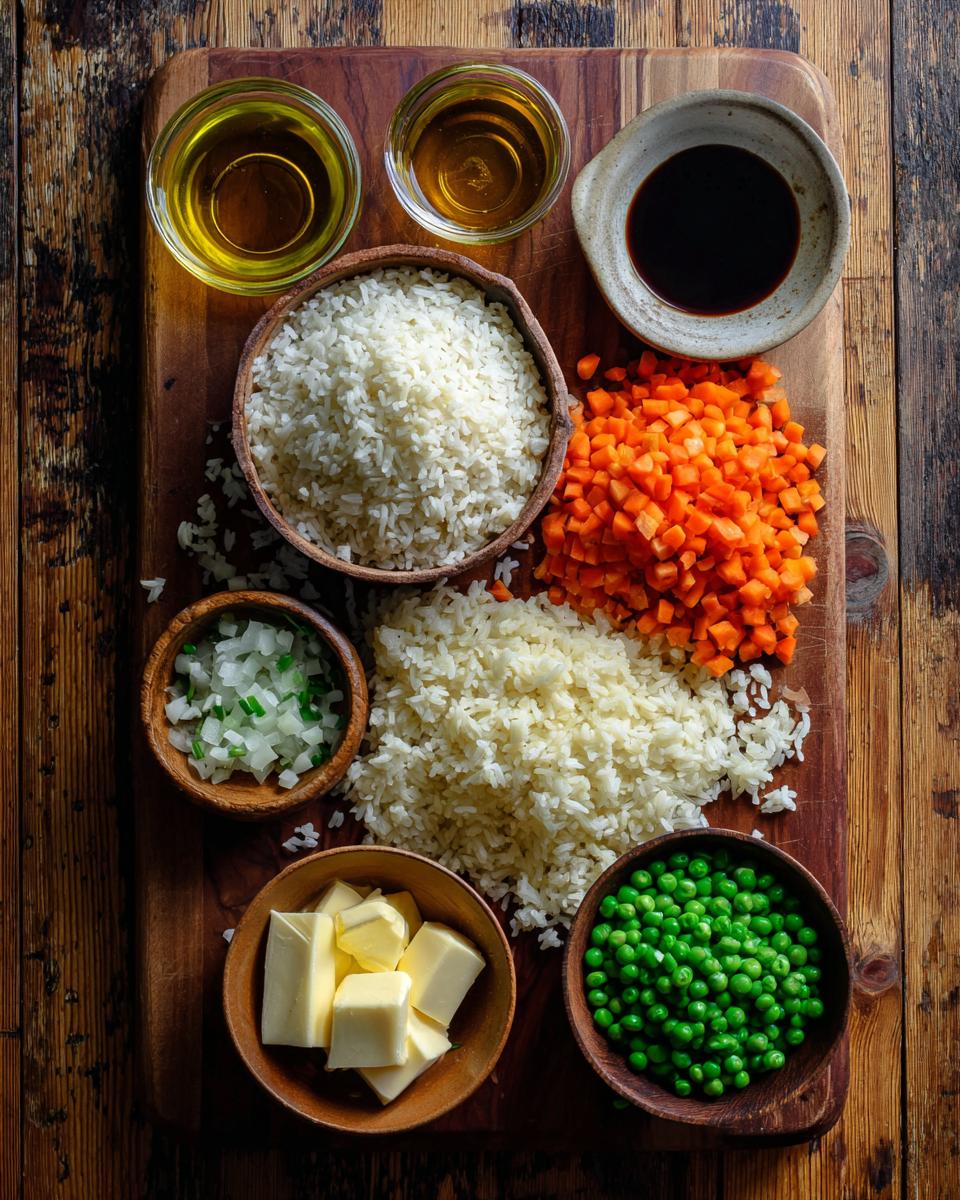
Making delicious Hibachi Fried Rice starts with gathering the right ingredients. While the technique is important, having these specific items on hand ensures you capture that classic flavor you love from your favorite hibachi grill. Don’t worry, they’re all super accessible! My recipe calls for 3 cups of cooked rice, and here’s a crucial tip: make sure it’s day-old and chilled. This isn’t just a suggestion; it’s the secret to fluffy grains that don’t clump together. We’ll also be using 2 tablespoons of oil (vegetable or canola work perfectly), ½ cup each of chopped onion and carrots, and ½ cup of frozen peas for that pop of color and sweetness. Two cloves of minced garlic are non-negotiable for flavor, along with 2 tablespoons of soy sauce, 1 tablespoon of butter, and a teaspoon of sesame oil. Salt and pepper are your friends for seasoning, and if you want to add some oomph, ½ cup of cooked and diced protein like chicken, shrimp, or beef is a fantastic optional addition.
Key Components for Your Hibachi Fried Rice
The foundation of great Hibachi Fried Rice truly rests on a few key players. First, that day-old, chilled rice is paramount; it keeps the dish from becoming mushy. Next, we have our vibrant vegetables: onions, carrots, and peas add essential texture, sweetness, and color. For cooking, a neutral oil like vegetable or canola is perfect for high-heat stir-frying. And don’t forget the protein! Whether it’s chicken, shrimp, or beef, it turns this delicious side into a hearty main course.
Flavor Boosters for Hibachi Fried Rice
Now, let’s talk about those magical ingredients that give Hibachi Fried Rice its signature taste. Soy sauce provides that incredible umami depth and savory goodness – it’s really the backbone of the flavor. A touch of butter, melted in at the end, adds richness and a beautiful gloss. And that distinct, nutty aroma you associate with hibachi? That’s the sesame oil working its magic! Just a little goes a long way. Finally, a simple sprinkle of salt and pepper ties all these wonderful flavors together, balancing the dish perfectly.
Step-by-Step Guide: How to Make Hibachi Fried Rice
Now for the fun part – bringing all those wonderful ingredients together to create your very own Hibachi Fried Rice! Don’t be intimidated; this process is incredibly straightforward and forgiving. The key is to work quickly once you start cooking, as stir-frying happens fast. I’ll walk you through each step, making sure you get that perfectly fluffy, flavorful fried rice every single time. Get ready to impress yourself!
Prepping Your Ingredients for Hibachi Fried Rice
Before you even think about turning on the stove, make sure all your ingredients are prepped and ready to go. This is called “mise en place” and it’s super important for stir-fries! Chop your onion and carrots, mince your garlic, and have your frozen peas measured out. Most importantly, have your day-old, chilled rice sitting by, ready to be added.
Cooking the Perfect Hibachi Fried Rice
First, heat your oil in a large skillet or wok over medium-high heat. You want it shimmering but not smoking. Add your chopped onions and carrots, stirring frequently for 3-5 minutes until they start to soften. Next, toss in the peas and minced garlic, cooking for just another 1-2 minutes until you smell that wonderful garlic aroma. Be careful not to burn it! Now, push all those lovely veggies to one side of the pan, creating an empty space. Add your chilled rice to the empty side, breaking up any clumps with your spatula. Pour the soy sauce directly over the rice, then stir everything together, making sure the rice is evenly coated and mixed with the vegetables. This is where the magic really starts to happen!
Finishing Touches for Your Hibachi Fried Rice
Once the rice and vegetables are well combined, add the butter and sesame oil to the skillet. Continue to stir until the butter is completely melted and everything is glistening and beautifully coated. If you’re adding cooked protein like chicken, shrimp, or beef, now is the time to fold it in. Stir gently until the protein is heated through. Finally, give your Hibachi Fried Rice a taste and season with salt and pepper as needed. I usually add a little extra pepper for that authentic hibachi kick. Serve it hot as a fantastic side dish or a satisfying main course!
Tips for Success with Your Hibachi Fried Rice
Making Hibachi Fried Rice is pretty straightforward, but a few little tricks can elevate your homemade version from good to absolutely amazing. I’ve learned these over many batches, and they’re what really make the difference in achieving that restaurant-quality flavor and texture. Pay attention to these details, and you’ll be a fried rice master in no time!
Achieving the Best Texture for Hibachi Fried Rice
The single most important tip for perfect Hibachi Fried Rice is using day-old, chilled rice. Freshly cooked rice has too much moisture, leading to a gummy, clumpy mess. The cold, dry grains separate beautifully in the pan, giving you that wonderful fluffy texture. Also, make sure your skillet or wok is hot! High heat is essential for stir-frying; it cooks quickly and prevents steaming.
Customizing Your Hibachi Fried Rice
While my recipe is a fantastic starting point, don’t hesitate to make your Hibachi Fried Rice your own! Feel free to swap out or add other quick-cooking vegetables like bell peppers, mushrooms, or even some thinly sliced cabbage. For proteins, practically anything goes: leftover roasted chicken, sautéed shrimp, thinly sliced beef, or even tofu cubes are delicious additions. Just make sure any protein is already cooked before adding it to the fried rice!
Frequently Asked Questions About Hibachi Fried Rice
I get a lot of questions about making Hibachi Fried Rice, and that’s great! It means you’re thinking about the process and wanting to get it just right. Here are some of the most common inquiries I receive, along with my best advice to help you master this delicious dish. Hopefully, these answers will clarify any lingering doubts and boost your confidence in the kitchen!
Can I use fresh rice for Hibachi Fried Rice?
While you technically can, I strongly recommend against using fresh rice for Hibachi Fried Rice. Day-old, chilled rice is much drier, which prevents it from clumping and becoming mushy when stir-fried. If you only have fresh rice, spread it out on a baking sheet and let it air dry in the fridge for an hour or two before cooking.
What kind of protein can I add to Hibachi Fried Rice?
The beauty of Hibachi Fried Rice is its versatility! You can add almost any cooked protein. Diced chicken, shrimp, or thinly sliced beef are classic choices. For a vegetarian option, try tofu or even an egg scrambled directly into the rice. Just make sure your protein is cooked before adding it to the skillet to heat through.
How do I store and reheat leftover Hibachi Fried Rice?
Storing leftover Hibachi Fried Rice is easy! Let it cool completely, then transfer it to an airtight container and refrigerate for up to 3-4 days. To reheat, simply microwave until hot, or for best results, stir-fry it again in a hot skillet with a tiny bit of oil until warmed through and slightly crispy.
Is Hibachi Fried Rice suitable for vegetarians?
Absolutely! This Hibachi Fried Rice recipe is naturally vegetarian if you omit any added meat. The main ingredients are rice and vegetables, which are already vegetarian-friendly. For extra protein, you can easily add scrambled eggs, tofu, or even some edamame. Just ensure your soy sauce is vegetarian-friendly.
Serving Suggestions for Hibachi Fried Rice
Hibachi Fried Rice is incredibly versatile! It shines as a delicious side dish alongside grilled beef, chicken, or shrimp. For a full hibachi experience, pair it with some sautéed vegetables like zucchini and mushrooms. It can also stand proudly as a satisfying main course all on its own, especially if you’ve loaded it up with your favorite protein and extra veggies. A sprinkle of chopped green onions or a drizzle of sriracha adds a lovely final touch!
Nutritional Information for Hibachi Fried Rice
While I can provide estimated nutritional values for this Hibachi Fried Rice, please remember that these are approximations. The actual nutritional content will vary depending on the specific brands of ingredients you use, any substitutions you make, and portion sizes. Therefore, precise nutritional figures are not provided, but it gives you a general idea of what to expect from this delicious homemade dish!
Share Your Hibachi Fried Rice Experience
There you have it – your very own homemade Hibachi Fried Rice! I truly hope you enjoy making and devouring this recipe as much as I do. I’d absolutely love to hear how it turns out for you! Please leave a comment below with your thoughts, rate the recipe, or even better, share a picture of your delicious creation on social media. Tag me so I can see your amazing work!
Print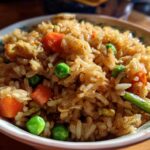
Easy Homemade Hibachi Fried Rice
- Total Time: 25 minutes
- Yield: 4 servings 1x
- Diet: Vegetarian
Description
This Hibachi Fried Rice recipe is easy to make at home. It features fluffy rice, tender vegetables, and a savory sauce, perfect as a side dish or main course.
Ingredients
- 3 cups cooked rice, day-old and chilled is best
- 2 tablespoons oil (vegetable or canola)
- 1/2 cup chopped onion
- 1/2 cup chopped carrots
- 1/2 cup frozen peas
- 2 cloves garlic, minced
- 2 tablespoons soy sauce
- 1 tablespoon butter
- 1 teaspoon sesame oil
- Salt and pepper to taste
- Optional: 1/2 cup cooked chicken, shrimp, or beef, diced
Instructions
- Heat oil in a large skillet or wok over medium-high heat.
- Add onions and carrots. Cook for 3-5 minutes until softened.
- Add peas and minced garlic. Cook for another 1-2 minutes until fragrant.
- Push vegetables to one side of the skillet. Add the cooked rice to the empty side. Break up any clumps of rice.
- Pour soy sauce over the rice. Stir to combine with the vegetables.
- Add butter and sesame oil. Stir until butter is melted and everything is well combined.
- If using, add cooked chicken, shrimp, or beef. Stir to heat through.
- Season with salt and pepper to taste.
- Serve hot.
Notes
- Use cold, day-old rice for the best texture. Freshly cooked rice can be too moist.
- Adjust the amount of soy sauce to your preference.
- Feel free to add other vegetables like bell peppers or broccoli.
- For a richer flavor, use chicken broth instead of some soy sauce.
- Prep Time: 15 minutes
- Cook Time: 10 minutes
- Category: Main Course
- Method: Stir-fry
- Cuisine: Japanese
Nutrition
- Serving Size: 1 cup
- Calories: 350
- Sugar: 3g
- Sodium: 600mg
- Fat: 10g
- Saturated Fat: 3g
- Unsaturated Fat: 6g
- Trans Fat: 0g
- Carbohydrates: 55g
- Fiber: 3g
- Protein: 8g
- Cholesterol: 10mg