Chocolate lava cakes have been my go-to showstopper dessert for years, ever since I first encountered their magical molten centers. There’s something truly captivating about a dessert that looks so elegant and complex, yet is surprisingly simple to create in your own kitchen. I remember the very first time I attempted them for a dinner party; I was terrified they wouldn’t turn out, but to my absolute delight, each one came out perfectly, oozing warm chocolate as soon as the spoon broke through the delicate crust. The gasps of delight from my guests solidified my love for this recipe.
These cakes are the epitome of dessert perfection – rich, decadent, and incredibly satisfying. They manage to be both comforting and sophisticated, making them ideal for any occasion, from a casual weeknight treat to a fancy celebration. Over the years, I’ve refined my technique to ensure a foolproof result every single time. Get ready to impress yourself and everyone around you with these incredible chocolate lava cakes!
Why You’ll Adore These Chocolate Lava Cakes
Making these chocolate lava cakes isn’t just about baking; it’s about creating an experience. You’ll absolutely adore them because they deliver on so many levels:
- Rich, Unforgettable Flavor: Every bite is a luxurious journey through intense chocolate.
- Surprisingly Quick Prep: From start to finish, you’re looking at less than 30 minutes for a dessert that tastes like it took hours.
- Impressive Presentation: They look incredibly elegant and sophisticated, perfect for wowing guests.
- Perfect for Any Occasion: Whether it’s a cozy night in or a grand celebration, these chocolate lava cakes fit right in.
The Irresistible Charm of Chocolate Lava Cakes
The true magic of chocolate lava cakes lies in that moment when your spoon breaks through the delicate cake exterior, revealing the warm, gooey, molten chocolate center. It’s a sensory delight – the rich aroma, the smooth texture, and the intense chocolate flavor combine to create pure bliss. These cakes don’t just satisfy a sweet tooth; they evoke a feeling of indulgence and pure joy.
Essential Equipment for Perfect Chocolate Lava Cakes
Having the right tools makes all the difference when crafting these delightful chocolate lava cakes. You don’t need a professional kitchen, but a few key pieces of equipment will ensure your success and make the process smooth and enjoyable. Each item plays a specific role in achieving that perfect molten center and beautifully baked exterior.
Tools for Crafting Your Chocolate Lava Cakes
- Four 6-ounce ramekins
- Heatproof bowl (for double boiler)
- Small saucepan
- Whisk
- Rubber spatula
- Measuring cups and spoons
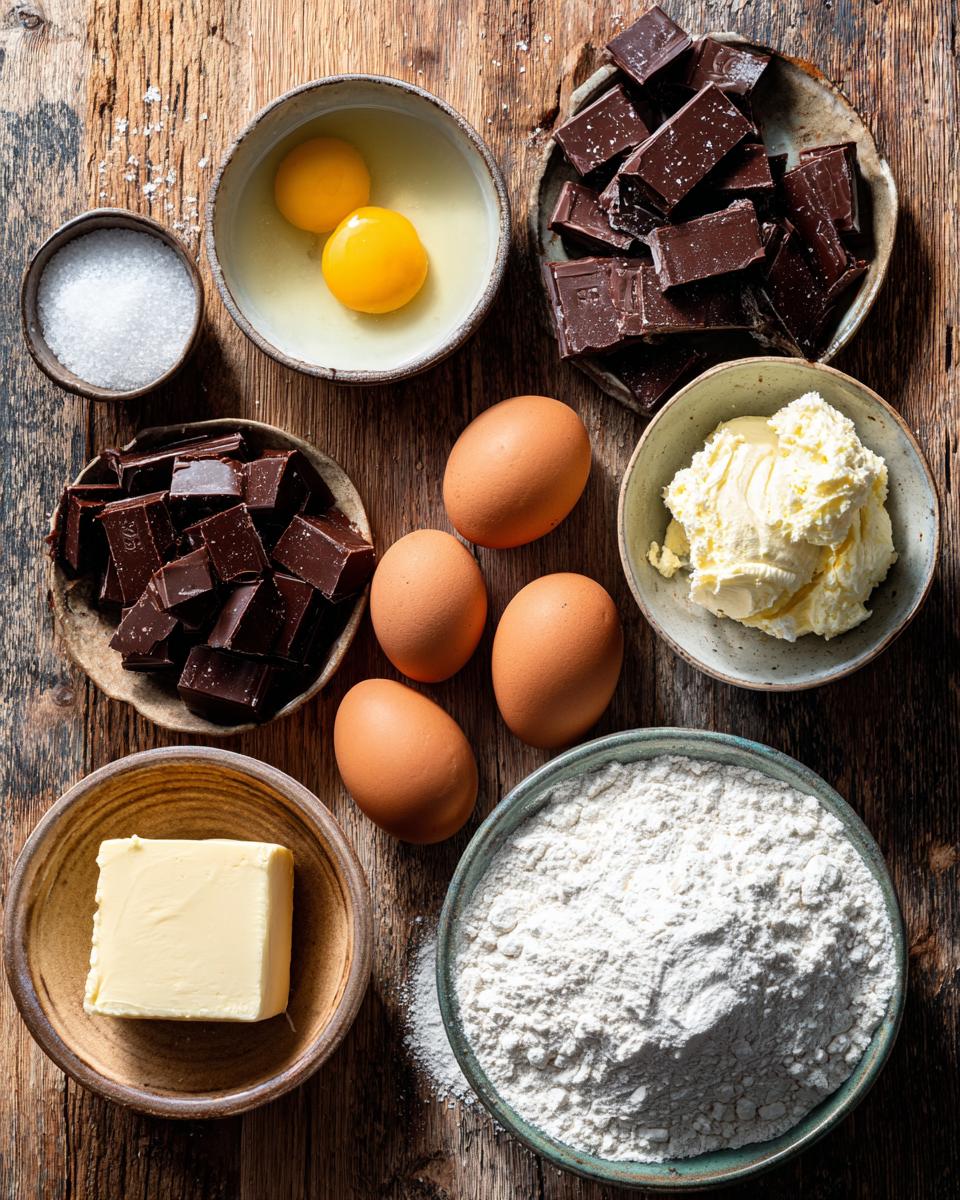
Ingredients for Your Chocolate Lava Cakes
Creating truly spectacular chocolate lava cakes starts with exceptional ingredients. Think of them as the building blocks for that luxurious taste and perfect molten center. Here’s exactly what you’ll need, with a few notes from my own kitchen:
- 1/2 cup (1 stick) unsalted butter, softened, plus more for ramekins: Make sure it’s at room temperature for easy creaming, and don’t forget to butter those ramekins generously!
- 4 ounces bittersweet chocolate, high-quality, finely chopped: This is where the magic happens! I always opt for a chocolate with 60-70% cocoa solids for the best flavor.
- 1 cup powdered sugar, sifted: Sifting prevents lumps and helps create a smooth batter.
- 2 large whole eggs, at room temperature: Room temperature eggs incorporate better into the batter, leading to a more uniform texture.
- 2 large egg yolks, at room temperature: These add richness and help achieve that custardy, molten center.
- 1 teaspoon alcohol-free vanilla extract: Pure vanilla really enhances the chocolate flavor.
- 2 tablespoons all-purpose flour, spooned and leveled: Just enough to give the cake structure without making it dense.
- Pinch of salt: A little salt always brightens and balances the sweetness.
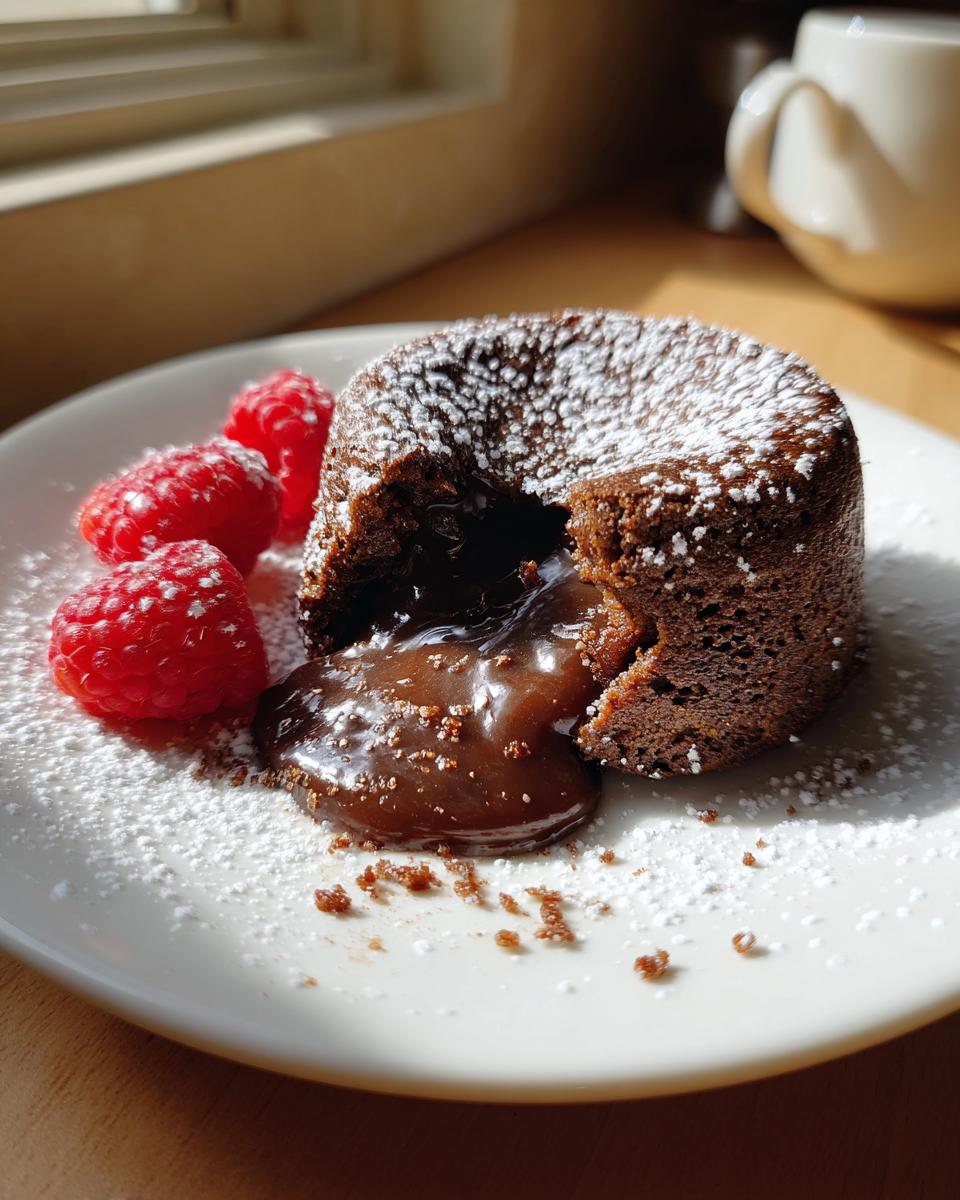
- Optional: fresh raspberries or powdered sugar, for serving: These are wonderful garnishes that add a pop of color and a touch of extra elegance to your chocolate lava cakes.
Selecting the Best for Your Chocolate Lava Cakes
The quality of your ingredients directly impacts the final taste and texture of your chocolate lava cakes. Using good quality bittersweet chocolate is non-negotiable; it’s the star of the show! Fresh, room-temperature eggs and butter also contribute significantly to the rich flavor and the desired gooey consistency. Don’t skimp here!
How to Make Chocolate Lava Cakes: Step-by-Step
Making chocolate lava cakes is surprisingly straightforward, but a few precise steps ensure that perfect molten center every single time. Follow these instructions carefully, and you’ll be enjoying decadent, warm chocolate bliss in no time. I promise, it’s easier than it looks!
- Preheat and Prep: First things first, get your oven ready! Preheat it to a hot 425°F (220°C). While the oven heats, grab your four 6-ounce ramekins. Generously butter the inside of each one, making sure to get all the way up the sides. Then, lightly dust them with flour, tapping out any excess. This crucial step prevents your precious chocolate lava cakes from sticking.
- Melt Chocolate and Butter: In a heatproof bowl, combine your chopped bittersweet chocolate and the softened unsalted butter. Set this bowl over a small saucepan of simmering water (make sure the bottom of the bowl doesn’t touch the water). Stir gently until the mixture is completely smooth and glossy. Remove the bowl from the heat and let it cool for a few minutes while you prepare the next steps – you don’t want to cook your eggs!
- Whisk in Sugar: Once the chocolate mixture has cooled slightly, whisk in the sifted powdered sugar until it’s fully incorporated and the mixture is smooth.
- Add Eggs and Vanilla: Now, whisk in the two whole eggs, two egg yolks, and the alcohol-free vanilla extract. Whisk until everything is well blended and the mixture is uniform in color and texture.
- Fold in Flour and Salt: Gently fold in the all-purpose flour and the pinch of salt using a rubber spatula. The key here is to mix *just* until the flour disappears. Overmixing will develop the gluten, which can lead to a tougher cake rather than the delicate texture we’re aiming for.
- Fill Ramekins: Divide the luscious batter evenly among your prepared ramekins. You can use a spoon or a small ladle for this.
- Bake to Perfection: Transfer the ramekins to a baking sheet and carefully place them in your preheated oven. Bake for 12-14 minutes. The edges of the cakes should appear set, but the center should still be visibly jiggly when you gently shake the ramekin. This jiggle is your sign of that beautiful molten core!
- Invert and Serve: This is the exciting part! Carefully remove the ramekins from the oven. Let them cool for just about 1 minute. Then, place a serving plate upside down over each ramekin and, holding both firmly, carefully invert them. Let the ramekin sit over the cake for another minute before lifting it away. This allows the cake to release cleanly.
- Garnish and Enjoy: Serve your magnificent chocolate lava cakes immediately, optionally garnished with fresh raspberries or a dusting of powdered sugar. The warm, gooey center is best enjoyed right away!
Preparing Your Decadent Chocolate Lava Cakes
The journey to perfect chocolate lava cakes begins with meticulous preparation. Start by preheating your oven to a precise 425°F (220°C) – temperature is everything for that molten core! Next, focus on your ramekins: butter them generously, ensuring every inch is coated, then lightly flour them. This critical step guarantees a smooth release and prevents any frustrating sticking, setting the stage for success.
Baking Perfect Chocolate Lava Cakes
Baking these chocolate lava cakes requires a keen eye and precise timing. Place the filled ramekins on a baking sheet and bake for 12-14 minutes. You’re looking for the edges to be set and slightly firm, but the very center should still have a distinct jiggle when lightly nudged. This jiggly center is the secret to your molten chocolate. After a brief cool-down, carefully invert each cake onto a serving plate, allowing it to rest for a minute before lifting the ramekin to reveal your perfectly gooey creation.
Tips for Success with Chocolate Lava Cakes
Achieving that perfect, ooey-gooey center in your chocolate lava cakes isn’t hard, but a few key tips will elevate your results from good to absolutely amazing. First and foremost, do not overbake! This is the most common mistake. The edges should be set, but the center needs to remain wonderfully wobbly. Trust your instincts and the jiggle test. Secondly, always use good quality bittersweet chocolate; it’s the star of the show and you’ll taste the difference. Finally, avoid overmixing the batter once the flour is added, as this can develop gluten and lead to a tougher cake rather than the delicate, tender crumb we’re after. Follow these simple guidelines, and you’ll consistently create show-stopping chocolate lava cakes.
Mastering Your Chocolate Lava Cakes
Consistent results for your chocolate lava cakes hinge on precise temperature control, both for your oven and your ingredients. High-quality chocolate is non-negotiable for flavor. Avoid overmixing, and always keep a close eye on the baking time to secure that coveted molten center.
Serving and Storing Your Chocolate Lava Cakes
Once your chocolate lava cakes are out of the oven and inverted, the best way to enjoy them is immediately! The warm, molten center is at its peak right after baking. For presentation, a simple dusting of powdered sugar or a handful of fresh raspberries adds a beautiful touch of color and cuts through the richness. If by some miracle you have leftovers, cover them tightly and refrigerate for up to 2-3 days. To reheat, you can microwave them for 20-30 seconds, or warm them in a preheated oven at 300°F (150°C) for about 5-7 minutes until the center is gooey again.
Enjoying and Preserving Chocolate Lava Cakes
For the ultimate experience, serve your chocolate lava cakes warm, right away! Store any rare leftovers in the fridge and gently reheat to revive their molten magic.
Frequently Asked Questions about Chocolate Lava Cakes
I know you might have a few questions swirling around, especially if this is your first time making chocolate lava cakes. Don’t worry, I’ve got you covered with answers to some of the most common queries:
- Can I use a different type of chocolate? Absolutely! While bittersweet chocolate gives the most classic and intense flavor, you can experiment. Milk chocolate will result in a sweeter, milder chocolate lava cake, and dark chocolate (70%+) will be more robust. Just ensure it’s good quality baking chocolate.
- Can I prepare the batter ahead of time? Yes, you can! This is one of my favorite make-ahead desserts. Prepare the batter as directed, then cover the ramekins tightly with plastic wrap and refrigerate for up to 24 hours. When ready to bake, let them sit at room temperature for about 30 minutes before baking as usual.
- My cakes didn’t have a molten center, what happened? This almost always means they were overbaked. Your oven might run hot, or you might have left them in a minute or two too long. Next time, try reducing the baking time by a minute or two and rely on that gentle jiggle test.
- What if I don’t have ramekins? You can use other oven-safe dishes of a similar size, like ceramic custard cups or even sturdy muffin tins (you’ll need to adjust baking time down, likely to 8-10 minutes, and ensure they are very well greased and floured).
Your Chocolate Lava Cakes Questions Answered
Got more questions about these decadent chocolate lava cakes? Rest assured, I’ve addressed common concerns like chocolate substitutions, making ahead, and troubleshooting a non-molten center. My goal is to ensure your baking experience is smooth and your results are spectacular.
Estimated Nutritional Information for Chocolate Lava Cakes
While these chocolate lava cakes are an indulgent treat, it’s always good to have an idea of their nutritional content. Please remember that these figures are estimates and can vary based on the specific brands of ingredients you use, the exact size of your ramekins, and any optional toppings. This is provided as a general guide:
- Serving Size: 1 cake
- Calories: Approximately 550
- Sugar: Approximately 45g
- Sodium: Approximately 120mg
- Fat: Approximately 35g
- Saturated Fat: Approximately 20g
- Unsaturated Fat: Approximately 10g
- Trans Fat: Approximately 0g
- Carbohydrates: Approximately 60g
- Fiber: Approximately 3g
- Protein: Approximately 8g
- Cholesterol: Approximately 200mg
Enjoying these rich chocolate lava cakes in moderation is key to savoring their decadence!
Share Your Chocolate Lava Cakes Experience!
Now that you’ve mastered these incredible chocolate lava cakes, I’d absolutely love to hear about your experience! Did they turn out perfectly molten? What did your guests think? Please share your thoughts in the comments below, rate the recipe, or even better, tag me on social media with photos of your delicious creations!
Print
Chocolate Lava Cakes
- Total Time: 29 minutes
- Yield: 4 servings 1x
- Diet: Vegetarian
Description
These chocolate lava cakes are rich and decadent, with a molten chocolate center. They are perfect for a special occasion or a comforting dessert.
Ingredients
- 1/2 cup (1 stick) unsalted butter, plus more for ramekins
- 4 ounces bittersweet chocolate, chopped
- 1 cup powdered sugar
- 2 large whole eggs
- 2 large egg yolks
- 1 teaspoon vanilla extract
- 2 tablespoons all-purpose flour
- Pinch of salt
- Optional: fresh raspberries or powdered sugar, for serving
Instructions
- Preheat oven to 425°F (220°C). Butter and lightly flour four 6-ounce ramekins.
- Melt butter and chocolate together in a heatproof bowl set over a saucepan of simmering water, stirring until smooth. Remove from heat and let cool slightly.
- Whisk in powdered sugar until combined.
- Whisk in whole eggs, egg yolks, and vanilla extract until well blended.
- Fold in flour and salt until just combined. Do not overmix.
- Divide batter evenly among the prepared ramekins.
- Bake for 12-14 minutes, or until the edges are set but the center is still jiggly.
- Carefully invert each cake onto a serving plate. Let stand for 1 minute before lifting the ramekin.
- Serve immediately, optionally with fresh raspberries or a dusting of powdered sugar.
Notes
- For best results, use good quality bittersweet chocolate.
- Do not overbake, or the center will not be molten.
- These cakes are best served warm.
- You can prepare the batter ahead of time and refrigerate it for up to 24 hours. Bring to room temperature before baking.
- Prep Time: 15 minutes
- Cook Time: 14 minutes
- Category: Dessert
- Method: Baking
- Cuisine: French
Nutrition
- Serving Size: 1 cake
- Calories: 550
- Sugar: 45g
- Sodium: 120mg
- Fat: 35g
- Saturated Fat: 20g
- Unsaturated Fat: 10g
- Trans Fat: 0g
- Carbohydrates: 60g
- Fiber: 3g
- Protein: 8g
- Cholesterol: 200mg