Lemon Bars have been a staple in my baking repertoire for years, and for good reason! There’s just something so perfectly balanced about that sweet, buttery shortbread crust paired with a bright, tangy lemon filling. It’s a dessert that instantly transports me back to sunnier days and family picnics, a true crowd-pleaser that never goes out of style. As someone who’s spent countless hours perfecting classic recipes, I can confidently say this version hits all the right notes for an unforgettable treat.
Why You’ll Love These Lemon Bars
These Lemon Bars aren’t just a dessert; they’re an experience! You’ll adore them because:
- They’re surprisingly simple to make, even for beginner bakers.
- The flavor profile is a delightful dance between sweet and tart.
- They’re incredibly versatile, perfect for any gathering, from casual brunches to elegant parties.
The Allure of Perfect Lemon Bars
The combination of a tender, buttery crust and a vibrantly zesty, smooth filling makes these Lemon Bars absolutely irresistible and a timeless classic.
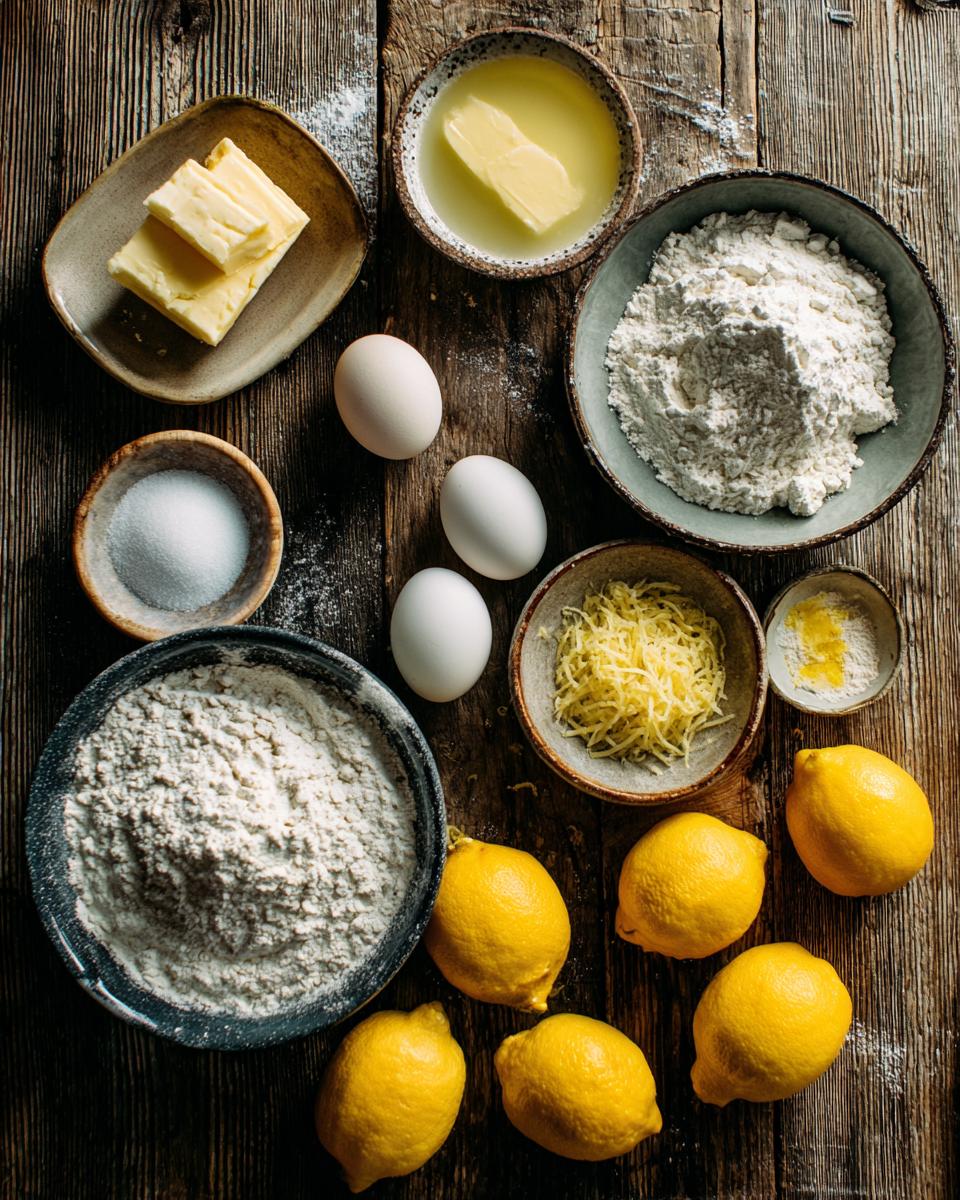
Essential Ingredients for Tangy Lemon Bars
Creating truly spectacular Lemon Bars starts with having the right ingredients on hand. I always emphasize quality here, especially when it comes to the star of the show – those bright, beautiful lemons! You’ll notice I’ve separated them into two groups, making it super easy to follow along whether you’re tackling the buttery crust or the luscious, zesty filling.
For the Buttery Crust of Your Lemon Bars
For that melt-in-your-mouth shortbread base, you’ll need 1 cup (that’s 2 sticks) of unsalted butter, softened to room temperature. We also need 1/2 cup of granulated sugar, 2 cups of all-purpose flour, and a tiny bit of salt – just 1/2 teaspoon – to balance everything out.
For the Zesty Lemon Bar Filling
Now for the star! Grab 4 large eggs, 1 1/2 cups of granulated sugar, and critically, 1/4 cup of fresh lemon juice (which usually comes from about 2-3 juicy lemons). Don’t forget 2 tablespoons of brightly aromatic lemon zest and 1/2 teaspoon of baking powder to give it that perfect texture. And for finishing, some powdered sugar for dusting!
Crafting Perfect Lemon Bars: Step-by-Step Instructions
Making these Lemon Bars is a joy, and I’ve broken down the process into easy-to-follow steps so you can create bakery-worthy treats right in your own kitchen! Precision with timing is key here, so keep an eye on your oven and trust the cooling process. We’re aiming for that ideal balance of firm crust and silky, set filling, and I promise you, it’s totally achievable.
Preparing the Buttery Crust for Your Lemon Bars
First things first, preheat your oven to 350°F (175°C) and lightly grease a 9×13 inch baking pan – this helps with easy removal. In a bowl, cream your softened butter and 1/2 cup granulated sugar until they’re light and fluffy. Gradually add the 2 cups of all-purpose flour and salt, mixing until a crumbly dough forms. Press this dough evenly into your prepared pan. Bake for 18-20 minutes, or until it’s just lightly golden.
Mixing the Tangy Lemon Bar Filling
While your crust is baking, it’s time to whip up that vibrant filling! In a medium bowl, whisk together your 4 large eggs, 1 1/2 cups granulated sugar, the fresh lemon juice, lemon zest, and baking powder. Whisk until the mixture is completely smooth and well combined. You want a consistent texture here, no lumps of sugar or unmixed baking powder, so take your time and whisk thoroughly.
Baking and Cooling Your Lemon Bars
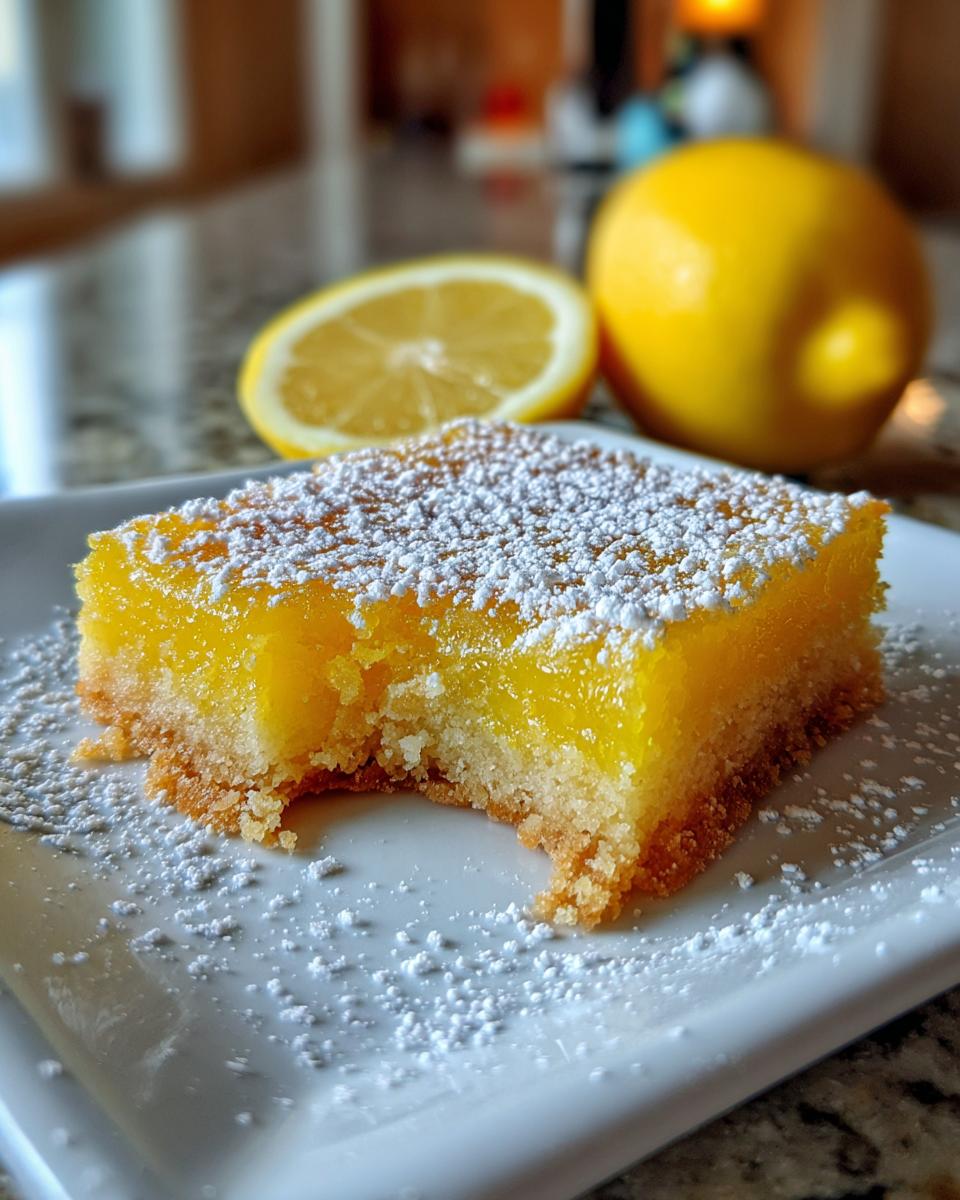
Once the crust is out of the oven, immediately and carefully pour your prepared lemon filling over the hot crust. Return the pan to the oven and bake for an additional 20-25 minutes. The filling should be set, with the edges lightly golden, but the very center might still have a slight jiggle – that’s perfect! The most crucial step now is to let them cool completely on a wire rack before you even think about cutting them. Dust with powdered sugar right before serving for that classic finish.
Expert Tips for Irresistible Lemon Bars
Making truly irresistible Lemon Bars is all about paying attention to a few key details. I’ve learned these little tricks over the years, and they make all the difference in turning a good bar into an absolutely phenomenal one. From the quality of your ingredients to how you handle the finished product, these tips will ensure your Lemon Bars are always a hit!
Achieving the Best Lemon Bars
The secret to the best Lemon Bars really lies in fresh ingredients. Always use fresh lemon juice and zest – bottled juice just doesn’t compare in flavor or aroma. Also, ensure your bars cool completely before cutting. This prevents the filling from oozing and gives you those perfectly neat, beautiful squares.
Storing Your Delicious Lemon Bars
Once cooled, store your leftover Lemon Bars in an airtight container. They’ll keep beautifully at room temperature for up to 3 days, or you can pop them in the refrigerator for up to 5 days. If you’re a fan of thicker crusts, feel free to increase the crust ingredients by about 25% for a heartier base!
Frequently Asked Questions About Lemon Bars
I get a lot of questions about making Lemon Bars, and I love helping fellow bakers troubleshoot! Here are some of the most common queries I receive, along with my best advice to ensure your next batch of tangy treats is nothing short of perfect.
Common Queries About Lemon Bars
Can I make Lemon Bars ahead of time? Absolutely! These are fantastic make-ahead desserts. They taste even better the next day once the flavors have fully melded. Just store them properly once cooled. Why are my Lemon Bars runny? This usually happens if they weren’t baked long enough, or if they weren’t cooled completely before cutting. The filling needs time to set up properly. Can I freeze Lemon Bars? Yes! Wrap individual bars tightly in plastic wrap, then place them in an airtight container or freezer bag for up to 3 months. Thaw in the refrigerator before serving.
Estimated Nutritional Information for Lemon Bars
For those curious about the specifics, here’s an estimated nutritional breakdown per serving (one bar) for these delightful Lemon Bars. Please remember, these values are approximations and can vary based on the exact brands of ingredients you use and how precisely you cut them. It’s a general guide to help you understand what you’re enjoying!
Share Your Lemon Bar Experience
I absolutely adore hearing from you! If you whip up these delightful Lemon Bars, please come back and tell me all about it in the comments below. Did you love them? Do you have a fun serving suggestion? Your feedback and shared experiences truly make my day! Feel free to tag me on social media too – I can’t wait to see your creations!
Print
Lemon Bars
- Total Time: 65 minutes
- Yield: 18 bars 1x
- Diet: Vegetarian
Description
These classic lemon bars feature a buttery shortbread crust and a tangy, sweet lemon filling. Perfect for spring desserts or any occasion.
Ingredients
- 1 cup (2 sticks) unsalted butter, softened
- 1/2 cup granulated sugar
- 2 cups all-purpose flour, plus 2 tablespoons
- 1/2 teaspoon salt
- 4 large eggs
- 1 1/2 cups granulated sugar
- 1/4 cup fresh lemon juice (about 2–3 lemons)
- 2 tablespoons lemon zest
- 1/2 teaspoon baking powder
- Powdered sugar, for dusting
Instructions
- Preheat oven to 350°F (175°C). Lightly grease a 9×13 inch baking pan.
- For the crust, cream together butter and 1/2 cup granulated sugar until light and fluffy.
- Gradually add 2 cups all-purpose flour and salt, mixing until just combined and a crumbly dough forms.
- Press the dough evenly into the prepared baking pan.
- Bake for 18-20 minutes, or until lightly golden.
- While the crust bakes, prepare the filling. In a medium bowl, whisk together eggs, 1 1/2 cups granulated sugar, lemon juice, lemon zest, and baking powder until smooth.
- Pour the lemon filling over the hot crust.
- Return to the oven and bake for an additional 20-25 minutes, or until the filling is set and the edges are lightly golden. The center should still have a slight jiggle.
- Let cool completely on a wire rack before cutting into bars.
- Dust with powdered sugar before serving.
Notes
- For best results, use fresh lemon juice and zest.
- Ensure the bars are completely cool before cutting to prevent the filling from oozing.
- Store leftover lemon bars in an airtight container at room temperature for up to 3 days, or in the refrigerator for up to 5 days.
- If you prefer a thicker crust, you can increase the crust ingredients by 25%.
- For a less tart flavor, reduce the lemon juice by 1 tablespoon.
- Prep Time: 20 minutes
- Cook Time: 45 minutes
- Category: Dessert
- Method: Baking
- Cuisine: American
Nutrition
- Serving Size: 1 bar
- Calories: 250
- Sugar: 30g
- Sodium: 70mg
- Fat: 12g
- Saturated Fat: 7g
- Unsaturated Fat: 4g
- Trans Fat: 0g
- Carbohydrates: 35g
- Fiber: 1g
- Protein: 3g
- Cholesterol: 70mg