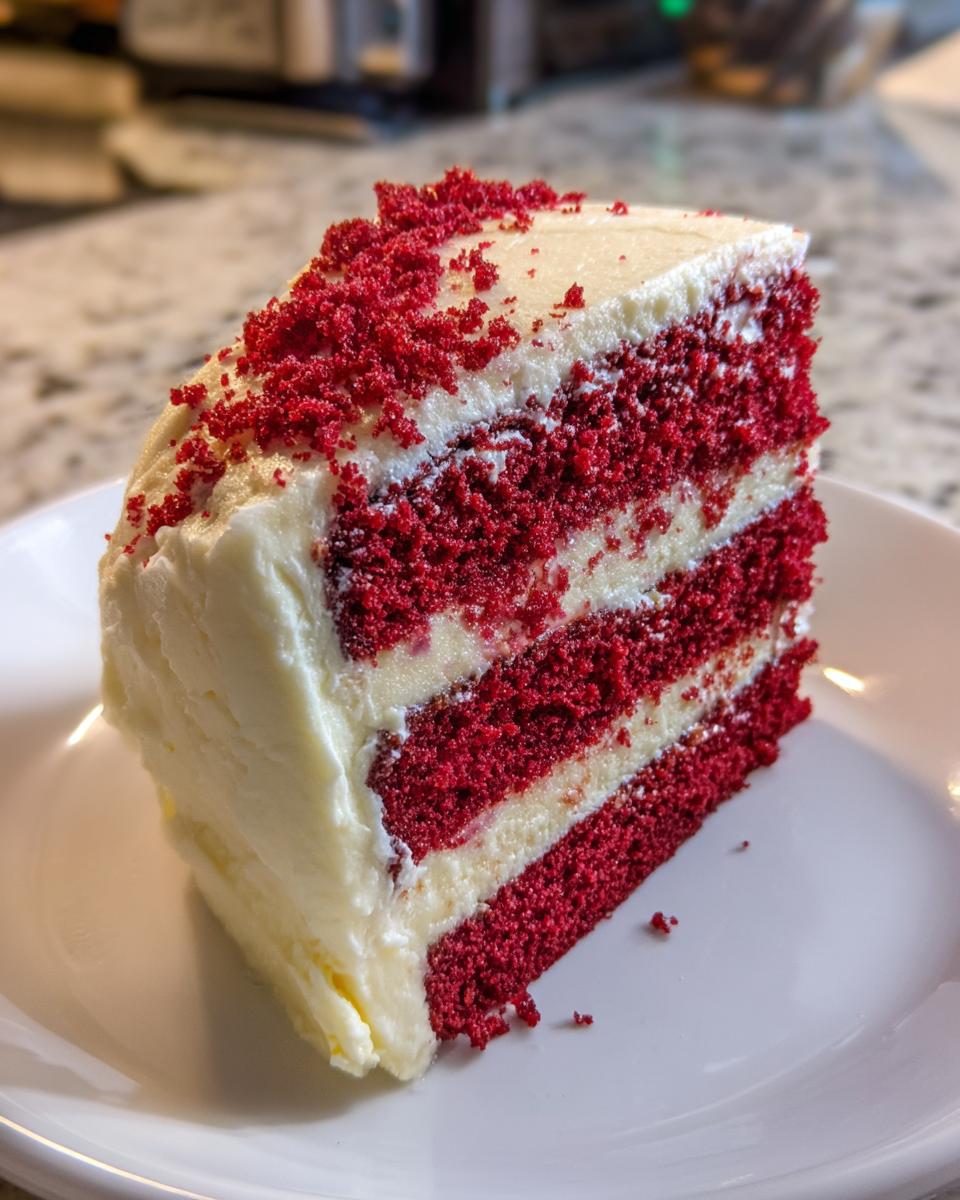
The first time I truly fell in love with red velvet layer cake was at my best friend’s wedding anniversary. It was a beautiful, intimate affair, and this stunning cake, with its vibrant red layers peeking through creamy white frosting, was the star of the dessert table. It wasn’t just beautiful; every bite was a perfect balance of moist cake, subtle cocoa, and that unmistakable tangy cream cheese frosting. From that moment, I was on a mission to recreate that magic in my own kitchen.
Over the years, I’ve baked countless cakes, learning the ins and outs of what makes a recipe truly special. There’s a real joy in bringing people together with delicious food, and sharing my trusted recipes is one of my favorite things to do. This particular red velvet layer cake recipe has been perfected through many celebrations, and I’m so excited for you to try it. It’s surprisingly easy for such an impressive dessert, and the flavors are simply out of this world.
Why You’ll Love This Red Velvet Layer Cake
Making this red velvet layer cake isn’t just about baking; it’s about creating a moment. I promise you, this isn’t just another cake recipe. This one consistently delivers:
- Unmatched Moisture: Thanks to the buttermilk and careful mixing, each bite is incredibly tender.
- Subtle Cocoa Perfection: Just enough cocoa to add depth without overpowering the classic red velvet flavor.
- Tangy Sweet Frosting: The cream cheese frosting is the ideal counterpoint, light, fluffy, and perfectly balanced.
- Surprisingly Simple: Despite its show-stopping appearance, the steps are straightforward and totally doable for any home baker.
The Perfect Red Velvet Layer Cake for Any Occasion
This red velvet layer cake is simply stunning, making it my go-to for birthdays, holidays, or just a special Sunday dinner. Its vibrant color and comforting flavor make every occasion feel a little more festive and memorable. It’s a true crowd-pleaser that always brings smiles to faces.
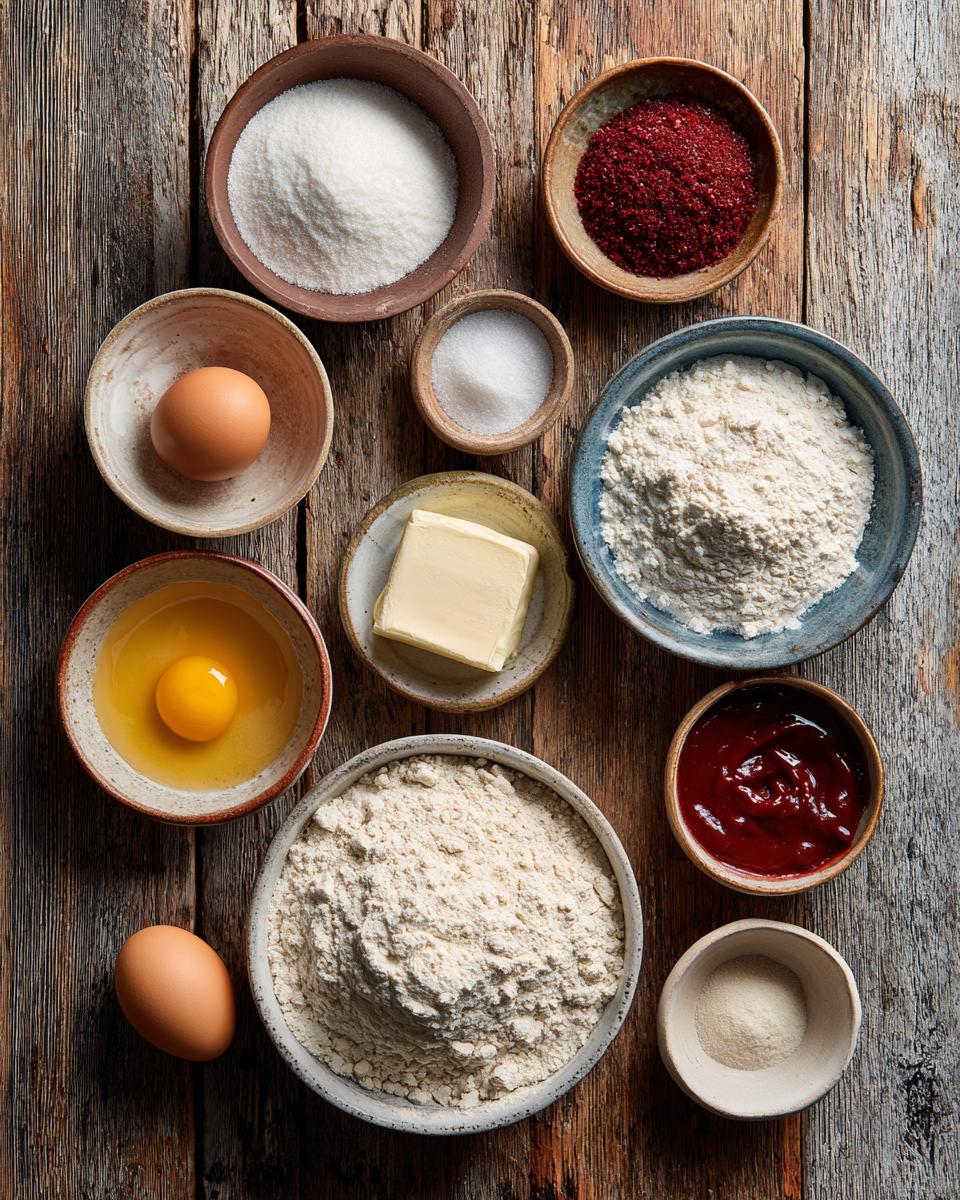
Essential Ingredients for Your Red Velvet Layer Cake
Creating a truly magnificent red velvet layer cake starts with understanding your ingredients. Each one plays a crucial role in developing that signature moist texture, subtle cocoa flavor, and vibrant color. Don’t skimp on quality here; using fresh, well-measured ingredients will make all the difference in your final masterpiece. For instance, buttermilk isn’t just for moisture; its acidity reacts with the baking soda to create that tender crumb and even helps to enhance the red hue. Having everything at room temperature is also key, so plan ahead!
Ingredients for the Moist Red Velvet Layer Cake
- 1 1/2 cups all-purpose flour
- 1 cup granulated sugar
- 1 teaspoon baking powder
- 1/2 teaspoon baking soda
- 1/4 teaspoon salt
- 1/2 cup unsalted butter, softened
- 1 large egg
- 1/2 cup buttermilk
- 1 teaspoon red food coloring
- 1/2 teaspoon alcohol-free vanilla extract
Ingredients for the Tangy Cream Cheese Frosting
- 8 ounces cream cheese, softened
- 1/2 cup unsalted butter, softened
- 4 cups powdered sugar
- 1 teaspoon alcohol-free vanilla extract
How to Make a Stunning Red Velvet Layer Cake
Making this red velvet layer cake might seem like a lot of steps, but I promise you, each one is straightforward and builds on the last to create a truly spectacular dessert. Just take your time, follow these instructions, and you’ll be enjoying a slice of heaven before you know it. The key is to be gentle with your batter and patient with your cooling process.
Preparing Your Red Velvet Layer Cake Pans and Oven
First things first, let’s get your oven and pans ready. You’ll want to preheat your oven to 350°F (175°C). This ensures an even bake from the moment your cake goes in. While the oven heats up, prepare two 8-inch round cake pans. I like to grease them really well with butter or a non-stick spray, then dust them generously with flour. Tap out any excess flour. This creates a non-stick barrier that helps your beautiful red velvet layer cake layers release easily after baking.
Mixing the Red Velvet Layer Cake Batter to Perfection
Now for the magic! In a large bowl, whisk together your dry ingredients: the all-purpose flour, granulated sugar, baking powder, baking soda, and salt. Make sure they’re thoroughly combined to distribute all those leavening agents evenly. In a separate, medium bowl, beat your softened unsalted butter until it’s light and creamy. Then, beat in the large egg until it’s fully incorporated and the mixture is fluffy. In a third small bowl, combine your buttermilk, red food coloring, and alcohol-free vanilla extract. This ensures your color is consistent throughout the batter.
Now, it’s time to bring them together. Gradually add your dry ingredients to the wet butter mixture, alternating with the buttermilk mixture. Start and end with the dry ingredients. Mix on low speed, or by hand, until the ingredients are just combined. The absolute golden rule here is do not overmix! Overmixing develops the gluten in the flour, leading to a tough, dry cake. A few streaks of flour are perfectly fine; they’ll disappear during the next step. Divide the vibrant red batter evenly between your two prepared cake pans.
Baking and Cooling Your Red Velvet Layer Cake Layers
Carefully place your filled cake pans into the preheated oven. Bake for 25-30 minutes. You’ll know they’re done when a wooden skewer or toothpick inserted into the center of a cake comes out clean. The edges will also start to pull away slightly from the sides of the pan. Once baked, remove the cakes from the oven and let them cool in their pans on a wire rack for about 10 minutes. This crucial resting period allows the cakes to firm up slightly, making them less likely to break when you invert them. After 10 minutes, carefully invert the cakes onto the wire rack to cool completely. They must be entirely cool before frosting, or your beautiful cream cheese frosting will melt!
Crafting the Creamy Cream Cheese Frosting
While your cake layers are cooling, let’s make that irresistible cream cheese frosting. In a large bowl, beat your softened cream cheese and softened unsalted butter together until the mixture is completely smooth and free of lumps. This is where using room-temperature ingredients really pays off! Gradually add the powdered sugar, one cup at a time, beating until it’s fully incorporated and the frosting becomes light and fluffy. Finally, beat in the alcohol-free vanilla extract. Taste and adjust sweetness if desired. This frosting should be smooth, creamy, and tangy – the perfect complement to your red velvet layer cake.
Assembling Your Red Velvet Layer Cake
Once your cake layers are completely cool (I can’t stress this enough!), it’s time for the grand finale: assembly! Place one cake layer on your serving plate or cake stand. Spread about one-third of the cream cheese frosting evenly over the top. Carefully place the second cake layer on top, pressing down gently. Now, use the remaining frosting to cover the top and sides of the entire cake. I like to use an offset spatula for smooth sides and a pretty swirl on top, but don’t worry about perfection. A rustic look is just as charming! Your stunning red velvet layer cake is now ready to be admired and devoured!
Tips for a Flawless Red Velvet Layer Cake
Making a show-stopping red velvet layer cake is easier than you think, especially with a few insider tips. These little tricks can elevate your cake from good to absolutely unforgettable. Pay close attention to ingredient temperatures and your mixing technique; they truly are the unsung heroes behind that perfect, moist crumb and beautifully frosted finish. Trust me, these small efforts yield big results!
Achieving the Signature Red Velvet Layer Cake Texture
The secret to a truly moist and tender red velvet layer cake lies in room temperature ingredients. Set out your butter, egg, buttermilk, and cream cheese at least an hour before you start baking. This helps them combine smoothly, creating an emulsified batter that bakes evenly. Also, resist the urge to overmix! Mix just until the ingredients are combined; a few lumps are better than a tough cake.
Frosting Your Red Velvet Layer Cake Like a Pro
For that dreamy, smooth cream cheese frosting, make sure both your cream cheese and butter are perfectly softened. Beat them together until completely smooth before adding the powdered sugar. To make frosting easier, use an offset spatula to spread small amounts at a time, working your way around the cake. A crumb coat (a thin layer of frosting that traps loose crumbs) before your final layer will give you a much cleaner finish!
Storing Your Red Velvet Layer Cake
Once you’ve enjoyed your first slices of this amazing red velvet layer cake, you’ll want to store any leftovers properly to keep them fresh. Because of the cream cheese frosting, it’s crucial to keep your cake refrigerated. Place any remaining cake slices or the entire cake in an airtight container. This prevents it from drying out and absorbing any fridge odors. Stored this way, your cake will stay delicious for up to 3 days. If you prefer your cake at room temperature, simply remove a slice from the fridge about 30 minutes before serving.
Frequently Asked Questions About Red Velvet Layer Cake
I get a lot of questions about this beloved dessert, and for good reason! There are a few unique aspects to making the perfect red velvet layer cake. Here are some of the most common questions I hear, along with my best answers to help you bake with confidence.
Can I make red velvet layer cake ahead of time?
Absolutely! This red velvet layer cake is actually a fantastic make-ahead dessert. You can bake the cake layers a day in advance, let them cool completely, wrap them tightly in plastic wrap, and store them at room temperature. The cream cheese frosting can also be made a day or two ahead and stored in an airtight container in the refrigerator. Just be sure to let the frosting come to room temperature and give it a good whip before assembling your red velvet cake. This is a great way to spread out your prep work!
What gives red velvet layer cake its unique flavor?
The distinctive flavor of red velvet layer cake comes from a beautiful combination of ingredients. It’s not just a vanilla cake dyed red! The key players are a touch of cocoa powder, which provides a subtle chocolatey depth, and buttermilk, which adds a slight tang and incredible moisture. The reaction between the acidic buttermilk and the baking soda also contributes to the cake’s tender crumb. All these elements, along with the cream cheese frosting, create that classic, complex, and utterly delicious red velvet taste.
Can I use less food coloring in my red velvet layer cake?
You certainly can! The amount of red food coloring used in a red velvet layer cake is largely a matter of personal preference. Traditionally, it’s quite vibrant, but if you prefer a more subtle hue, feel free to reduce the amount. You could even omit it entirely for a “naked” red velvet cake, which would still have all the delicious flavor. Keep in mind that older recipes sometimes relied on the natural reaction between cocoa powder and buttermilk to produce a reddish-brown tint, but modern cocoa processing doesn’t yield the same result, so some coloring is usually needed for that signature red.
Estimated Nutritional Information for Red Velvet Layer Cake
I know many of you like to keep an eye on the nutritional aspects of your treats, so I’ve put together an estimated breakdown for a single slice of this red velvet layer cake. Please remember that these figures are approximate and can vary based on the specific brands of ingredients you use, how precisely you measure, and even the exact size of your slice. It’s a guide, not a definitive declaration!
- Serving Size: 1 slice
- Calories: 450
- Sugar: 55g
- Sodium: 210mg
- Fat: 25g
- Saturated Fat: 15g
- Unsaturated Fat: 8g
- Trans Fat: 0.5g
- Carbohydrates: 50g
- Fiber: 1g
- Protein: 4g
- Cholesterol: 60mg
Share Your Red Velvet Layer Cake Creation
There’s nothing I love more than seeing your baking successes! Once you’ve whipped up this stunning red velvet layer cake, I’d be absolutely thrilled if you shared your experience. Drop a comment below, let me know how it turned out, or even better, snap a photo and tag me on social media! Your creations inspire me and the entire community. Happy baking!
Print
Red Velvet Layer Cake with Cream Cheese Frosting
- Total Time: 1 hour 30 minutes
- Yield: 12 servings 1x
- Diet: Vegetarian
Description
This recipe makes a beautiful and delicious red velvet layer cake, perfect for any celebration. The cake is moist with a hint of cocoa, and the cream cheese frosting adds a tangy sweetness.
Ingredients
- 1 1/2 cups all-purpose flour
- 1 cup granulated sugar
- 1 teaspoon baking powder
- 1/2 teaspoon baking soda
- 1/4 teaspoon salt
- 1/2 cup unsalted butter, softened
- 1 large egg
- 1/2 cup buttermilk
- 1 teaspoon red food coloring
- 1/2 teaspoon vanilla extract
- For the frosting:
- 8 ounces cream cheese, softened
- 1/2 cup unsalted butter, softened
- 4 cups powdered sugar
- 1 teaspoon vanilla extract
Instructions
- Preheat oven to 350°F (175°C). Grease and flour two 8-inch round cake pans.
- In a large bowl, whisk together flour, sugar, baking powder, baking soda, and salt.
- In another bowl, beat butter until creamy. Beat in egg.
- Combine buttermilk, red food coloring, and vanilla extract.
- Gradually add dry ingredients to wet ingredients, alternating with buttermilk mixture, beginning and ending with dry ingredients. Mix until just combined.
- Divide batter evenly between prepared pans.
- Bake for 25-30 minutes, or until a wooden skewer inserted into the center comes out clean.
- Let cakes cool in pans for 10 minutes, then invert onto a wire rack to cool completely.
- For the frosting: In a large bowl, beat cream cheese and butter until smooth. Gradually add powdered sugar, beating until light and fluffy. Beat in vanilla extract.
- Once cakes are completely cool, frost between layers and on top and sides of the cake.
Notes
- Make sure all ingredients are at room temperature for best results.
- Do not overmix the batter, as this can lead to a dry cake.
- For a deeper red color, you can add a little more red food coloring.
- Store leftover cake in an airtight container in the refrigerator for up to 3 days.
- Prep Time: 30 minutes
- Cook Time: 30 minutes
- Category: Dessert
- Method: Baking
- Cuisine: American
Nutrition
- Serving Size: 1 slice
- Calories: 450
- Sugar: 55g
- Sodium: 210mg
- Fat: 25g
- Saturated Fat: 15g
- Unsaturated Fat: 8g
- Trans Fat: 0.5g
- Carbohydrates: 50g
- Fiber: 1g
- Protein: 4g
- Cholesterol: 60mg